
Gimp – Gnu Image Manipulation Program, an open source program that like Photoshop is able to do amazing things with graphics and photo’s. Unlike Photoshop it costs nothing and it’s feature set is still comparable. This is a series of posts I’ve created on how Gimp can be used to help create worlds and give life to your imagination.
Creating Planets
Rather than go through the little details how this and that works I’m diving straight in, giving you the details of how I’ve used Gimp and for what… giving you all the magic. This kind of thing is accessible to all, I’m not expert and everything I’ve done I’ve learned myself.
Creating the kind of image used here is not as hard as you might think. First let’s create a star field.
Firstly download and install Gimp from https://www.gimp.org/
First thing to do is to create a new image to do this got to File >> New
Set the image size to whatever you want, but as an example make it 1024 x 768 and make it landscape.
Set it to fill with foreground colour which is black.
Create the stars by going to Filters >> Noise >> Hurl
Click on Randomise and then OK.
Te colour needs to be removed from the stars, to do this Click on Colours >> Desaturate >> OK
There’s far too many stars to make this sensible, so we need to reduce them. Click on Colours >> Levels start at about 200, but have a play undo (CNTRL Z) and redo it with different values until you’re happy with the result.
If you like some sparkle can be added to the stars, this is done by clicking on Filers >> Light and Shadow >> Sparkle. Set to about 0.15 to start but then play to make it how you want.
Save the starfield, we’ll come back to it later.
To create a planet is also pretty easy, first you need a firstly high definition texture file. It’s basically a picture and it can be anything. I got mine from Google but just remember copyright and all that for your work if going public.
Open this texture file in Gimp, if you want to crop it then go to Tool >> Transform Tools >> Crop

After making it the right shape go to Filters >> Distorts >> Distorts >> Apply Lens

In the lens there are a few settings to mess about with to make it look how you want and whether or not to cut away the excess area, which you need to do.

Now we need to give some shading to our little planet. On the right toolbar at the top add a new layer on top of the planet and call it shadow or something… anything. On the side toolbar pick the Ellipse tool.

Then draw a circle (best you can it won’t be perfect) around the planet but make it twice the size or thereabouts, make sure it’s been drawn on the shadow layer.

Go back to the toolbar, click on the bucket fill tool, on the colours below it click on it and select black.

Then fill the circle.

Staying on this layer go to Filters >> Blur >> Gaussian Blur. I used 600 and 600 but pick any figure you think is best.

Press M and click / drag to move the shadow to give the desired effect of partial shadow.

There is a better way, to remove the excess shadow, but the easiest for now is to go to the left hand toolbar and pick the eraser tool and rub it out. If you look down you can all kinds of brush shapes and sizes.

One this is done go to File >> Export As and export your planet as a .PNG file. It’s important to do this as PNG files support transparency better. Don’t forget to save your planet in Gimp format as you can work on it another time.

This will be how the PNG comes out, taking the background away means we can over lay it on another image, like our starfield.
Go back to the starfield image.
Click on File >> Open as Layers
Find your planet PNG and click ok.

Your planet will be plopped onto your starfield kind of like this depending on the sized you made both of them. To scale your planet go to Tools >> Transform >> Scale.
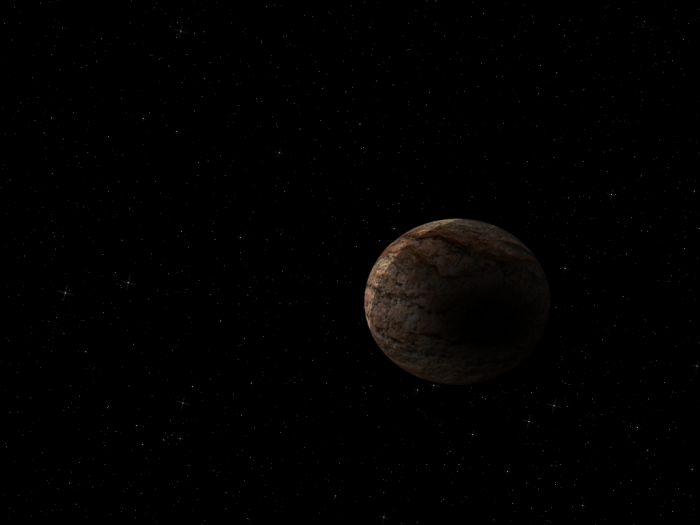
Move the grid about to make it how you want it, click Sale. Press M and click / drag to move the planet about and there it is!

Your first space scene.
The GIMP tool is really powerful, there are so many features and these tutorials will hopefully broaden your knowledge each time you use the tool. This ‘playing around’ I think is the best way to learn how to use it for the different things that as an artist you want to do them.
If there are any suggestions let me know – I’m always learning too and I’m keen to try out new stuff!

Also find Planet Simon on Twitter
Come and visit find me on my Planet Simon Facebook Page
Find some of my pictures on Instagram

Nice post! I’ve been using gimp for years and still learning, I mostly use it for my fashion blog and related content but these mini “tutorial” is pretty cool
LikeLiked by 1 person
Thanks, I’m hoping to do lots with this and make it really useful. Plus it’s a good excuse to play and do a cool stuff! 😀
LikeLiked by 1 person
I’m going to try this program. Can you put pre-existing photos into it and manipulate them?
LikeLiked by 1 person
Sure you can, I’ve seen some great work where people have merged picture parts into something very artistic.
LikeLiked by 1 person
Interesting. I do most of my artwork by hand, but I dabble a little with Photoshop. I would not have thought to make a planet this way: putting a lens distortion on a texture. I may have to try that some time.
LikeLiked by 1 person
It’s pretty neat… I think there are other ways to try but give it a go 😀
LikeLiked by 1 person
This is the kind of thing in learning. It’s how to use the different tools in all kinds of ways.
LikeLiked by 1 person